Category Archives: Linux hacking

Stuff I do with linux

PHAD: A Replacement for Pi-Hole’s Chronometer (and also PADD)

Pi-Hole is an amazing DNS based ad blocker. One of its ancillary features is it’s text-based “Chronometer” mode. If you invoke pihole with the “-c” option you will see a display like the following that refreshes automatically:

While this Chronometer is handy it’s still rather lacking in the information it provides. A drop-in replacement called PADD has been available for a while that provides significantly more data about your Pi-Hole’s activity. While PADD is a huge leap over the built-in Chronometer functionality I felt that it was also a little lacking. Many people run Pi-Hole on Raspberry Pi’s (not surprising given its name), and many people who use Chronometer or PADD use a TFT LCD screen, many of which are actually touchscreens.

It occurred to me that a highly customizable text display that leverages the features of LCD touchscreens would be a very powerful tool to complement Pi-Hole. The result of this thought is PHAD, the Pi-Hole Alternate Display. PHAD is a python app that uses the highly popular Jinja2 template engine to make it possible to create custom displays. PHAD also supports cycling between multiple templates by tapping on the Pi-Hole’s touchscreen or on a timed schedule.

For more details on installing and using PHAD see the projects README file over on GitHub.

height-solitude

height-solitude


Pi-Hole on a Raspberry Pi 3

Just a few notes on my setting up Pi-Hole on a Raspberry Pi 3:

  • I used NOOBS to initially install Raspbian linux (jessie)
  • I wanted to set up 2 of them, one on my internal network and one on my DMZ, so I bought/configured two of everything.
  • It’s then an easy process to run the Pi-Hole installation command found on the projects home page
  • I have a PoE switch and was hoping to use that to power the  Pi instead of having an additional power supplies & cables running everywhere. I found this handy PoE splitter that provides the necessary power to the Pi. It’s working like a charm!
  • I was also interested in having a display on the Pi, so I bought a pair of these TFT displays and these enclosures that work nicely with them.
  • To get the TFT display to work you need to install the driver found in LCD-show-170703.tar.gz by following the instructions found here.
  • After the drivers are installed the Pi reboots and the display should start working.
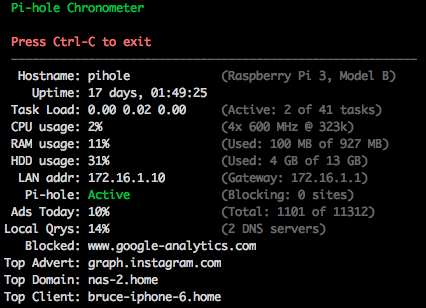
  • To display the Pi-Hole stats I’m using the chronometer2 script.
  • To select the appropriate font size for the display:
    pi@pi-hole:~ $ sudo  dpkg-reconfigure console-setup

    • Encoding: UTF-8
    • Character Set: Guess optional character set
    • Font for the console: Terminus
    • Font size: 8×14
  • To prevent the display from going to sleep add ‘consoleblank=0’ to the end of /boot/cmdline.txt

Modifications to chronometer2

I like the basic concept of chronometer2 quite a bit, but I felt it could be improved upon slightly. For example, I don’t use my pi-hole as a DHCP server, so the few lines of the display showing it’s disabled is just wasted screen real estate as far as I’m concerned. I would much rather see the top client, top domain, and top advertiser that the original chronometer displays. I also wanted an easy way to be able to restart the chronometer2 display on my TFT display that didn’t require rebooting the whole Pi. When I’m tinkering with the chronometer2 script it’s annoying to keep rebooting the Pi and causing brief DNS outages on my network.

Given these thoughts I decided to make some tweaks to the script. Having spent years as a software developer I had one other small detail that I kept in mind – I didn’t want to change the default behavior in any way. So if you’re using the existing chronometer2 script and just drop my version into place on your pi-hole then you won’t see any difference unless/until you start playing with the new parameters I added. Without further ado, the parameters I added include:

    • -f | –format <format_string>
      This option lets you customize the display by being able to change the order of items that are displayed or even removing them. Each section of the display has been assigned an arbitrary letter. You just specify a format string in the order in which you want items displayed:

      a : Logo
      b: Pihole Information
      c: Pihole Statistics
      d: Network Details
      e: DHCP Information
      f: System Information

      The default formatting string is simply ‘abcdef’, so if you don’t specify a custom format string then chronometer2 will use this value, which means the display will look exactly like the one you’re used to. If, like me, you don’t want to display the DHCP details then you would simply include ‘-f abcdf’ on the command line, leaving ‘e’ out of the format string.


  • -t | –top
    This will tell chronometer2 to include the top client/domain/advertiser information in the Statistics section of the display
  • -p | –pid <filename>
    This will write the PID (process ID) of chronometer2 to the specified file, making it easy to kill the script if you ever need to.

Why include the –pid option, you might ask? Good question! As I mentioned above, I wanted a way to be able to restart chronometer2 on my TFT display without having to reboot my Pi or doing any other tricky shenanigans. Most people set up their chronometer script to run out of /etc/profile or /home/pi/.bashrc by simply adding either ‘pihole -c’ or ‘./chronometer2.sh’ to the bottom of one of those files. Here’s how I have my .bashrc set up:

if [ "$TERM" == "linux" ] ; then
 while :
 do
   /home/pi/chronometer2.sh $(cat /home/pi/chronometer2.cmdline)
   sleep 1
 done
fi

For those of you who aren’t terribly familiar with shell scripting, here’s a breakdown of what this does:

  1. chronometer2.sh is run only if the TERM environment variable is set to “linux”. This is what my Pi sets the TERM variable to when running chronometer2.sh locally on the TFT display. When I ssh into my Pi the TERM variable is set to “xterm”, so I’m not greeted by the chronometer2.sh script starting up every time I ssh into it.
  2. chronometer2.sh is run in an infinite loop (inside the while/do/done block). So if/when the script dies for any reason it will automatically restart after a one second delay.
  3. The script gets its command line arguments by reading them from the file /home/pi/chronometer2.cmdline each time it starts up.

The file /home/pi/chronometer2.cmdline looks like this:

-f abcdf -t -p /home/pi/chronometer2.pid

I also have a command called ‘killc2’ set up in my .bashrc:

alias killc2='kill $(cat /home/pi/chronometer2.pid)'

So now whenever I want to tinker with the chronometer2 script in any way I just edit the script and/or my chronometer2.cmdline file, invoke the command ‘killc2‘, and after a short pause the script restarts on the TFT display with the new parameters and any other changes I made.

My modifications to the chronometer2 script can currently be found here. If they’re merged into the official chronometer2 project I’ll update this to point there instead.


emotion-phase

emotion-phase


IMAPrunner

Here’s a handy little IMAP utility people may find useful. IMAPrunner was an excuse for me to learn a little more about Python programming and to also throw together something useful at the same time.  It’s a Python script that lets you associate scripts/commands with mail messages in individual mail folders.

I now have a cron job set up that checks for any e-mails I add to a “spam” folder.  If I receive any spam I just move it to that folder.  IMAPrunner will then pass the spam e-mail onto SpamAssassin, razor, pyzor, etc. and then delete the e-mail automatically. There’s really no limit to what you can trigger in response to an e-mail with it.  And I already have a few thoughts for improvements to it…

Instant Nagios Starter

I was recently contacted by Packt Publishing and asked to review their book Instant Nagios Starter, by Michael Guthrie.  I’ve actively used Nagios (and forks) for well over a decade now, and have even contributed some code development to it, so I’m intimately familiar with installing, configuring, and managing Nagios environments.

Nagios is an extremely powerful and flexible monitoring platform, and those two attributes also result in it also being a fairly complex piece of software to configure if you’ve never dealt with it before.  This book does an excellent job of walking you through the steps of installation and basic configuration of Nagios on a CentOS/RHEL system.

Nagios, as with just about any complex piece of software, relies on a number of system configuration settings, files in multiple locations, etc. to run properly.  Instant Nagios Starter does an excellent job of walking you through each and every dependency so that you can get a basic Nagios server up and running in no time at all.  If you’re new to Nagios, or need to spin up a new Nagios server and may have only ever worked with existing Nagios setups in the past, then this guide will save you a lot of time and potential aggravation in getting started.

The title of this book is extremely accurate – it will get you started with Nagios in almost no time at all.  If you’re looking for anything beyond the basics of setting up Nagios then you’ll want something a bit more in depth, and Packt Publishing has you covered there as well since they also have a number of other books on the subject.

Perhaps the only thing that would make this book more valuable would be if Packt Publishing offered a download of a VMWare CentOS instance with Nagios pre-installed (or partially installed) for those who don’t want to waste any time installing linux first.

nagios-plugins patch to check_dig

I use Nagios (actually Icinga) at work and do a lot of tinkering with it.  I recently needed to modify the check_dig command to allow for verifying whether a response is authoritative or not.  This is apparently something that’s asked for a lot according to some Google searching that I’ve done, so I wrote a quick patch, and I’ve submitted it to the Nagios Plugin project on Sourceforge.  Hopefully they’ll accept it, but in the meantime I thought I’d post it here as well so others can make use of it if the have a need for it.

The patch is available two ways depending on your preference.  You can just download a patched version of nagios-plugins-1.4.15.tar.gz, build the plugins as you normally would, and be on your way.  Or you can download the official version of nagios-plugins-1.4.15.tar.gz from Sourceforge and just apply this check_dig patch.  To apply the patch:

[brucep@carbon:~/tmp] tar xvzf nagios-plugins-1.4.15.tar.gz
[brucep@carbon:~/tmp] gunzip check_dig.patch.gz
[brucep@carbon:~/tmp] patch -p0 < check_dig.patch # Note, that’s a zero, not the letter o.

Assuming the patch command doesn’t report any problems you should be all set.  Just rebuild the plugins and you’re good to go.  This adds a ‘-e’ option to the command line.  If you use -e then check_dig will verify that the flags header from dig contains the ‘aa’ flag.  If the ‘aa’ flag isn’t found then check_dig will return a CRITICAL error.

If you’d like to keep track of the status of the patch on Sourceforge you can check it here.