If you’ve ever had a need to drop something onto a stage, be it snow, confetti, a prop brick or rock, or something else altogether, then you’ve likely wanted something called a “drop box”. As the name implies, it’s a box (or other container) that is used to remotely drop something onto the stage. While not necessarily suited for snow (unless you want a comedic effect of a bunch of snow all falling at once), it can be useful for dropping many other items. Building one of these is actually very simple, easy, and best of all inexpensive.
The key to remotely triggering something to drop, unwind, etc. is to have a way to essentially pull a pin electronically. A common approach to doing this is by the use of solenoids, but solenoids come in all shapes and sizes, and unless you know exactly what you need it can be a daunting task to get the correct one without wasting time & money. A less expensive approach, which can work just as well, is to use a car door lock actuator. This is the device that locks and unlocks a car door that has electric locks, and you can find them easily and they’re very inexpensive. You can find them for sale on sites like Amazon.com for as little as $5.00 each. You can also find them at many car part stores, and if you have access to an automotive junkyard you might be able to get some there for free or very cheaply.
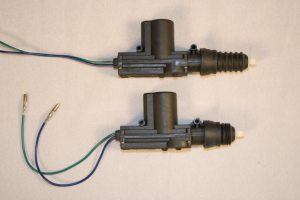
A car door actuator is designed to run on 12 volts DC, however for your needs a regular 9 volt battery is likely enough. When voltage is applied one way the actuator quickly extends to a fully open position. When voltage is applied the other way it quickly contracts to a fully closed position. The distance it travels is approximately 3/4″. Below is a photo of actuators in fully open and fully closed positions:
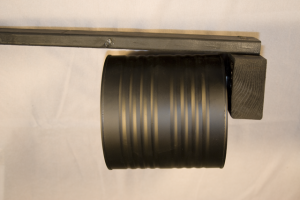
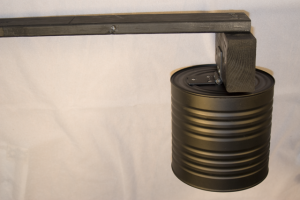
To build a simple drop box you just need a couple pieces of wood, a tin can, a hinge, and an actuator. Attach a hinge to the back of a tin can and mount it on a block of wood. Attach the block of wood to a long strap of wood so you have something that looks like this:
The left image shows the can in the “up” position. It will be held that way by the actuator. Gravity will then drop it into the position shown on the right, dropping the contents of the can out onto the stage floor. The wooden block that the hinge is attached to also serves to stop the can from swaying back and forth, but instead keeps it vertical.
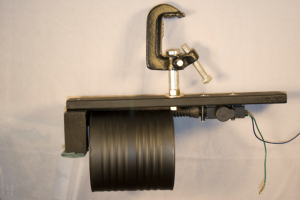
Put the tin can in the “up” position, then mount an actuator on the horizontal strap of wood so that it just holds the can when fully extended. Make sure that you mount the actuator so that the can drops free when the actuator is retracted. You might also want to staple a scratch piece of cloth to the bottom of the wooden block that the hinge is on. This will help to muffle the sound the can makes when it drops. Add a clamp so you can hang this from a lighting grid and you’re all set:
The one thing I have not done yet is to add a safety cable. I strongly recommend that you attach a short flexible cable between the clamp or wood strap to the tin can, and I will be doing that shortly after I post this. And as with anything you hang over a stage or audience make sure the whole thing has a safety cable attached to the lighting grid.
All that’s left after this is to wire it up for use. As mentioned before, a simple 9 volt battery should suffice. However if you want to get fancy then just wire a DC transformer to it and you can control it from a standard theater lighting system.
Obviously the actuators can be used for all sorts of things. If you need to drop a bunch of balloons, confetti, etc. then just build a larger box with a hinged bottom and use one or more actuators in the same way to hold the bottom closed. If you need a flag to unfurl just wind the flag around a wooden dowel like it was a window shade and attach a similar dowel along the bottom edge to give it some weight. Hold the bottom dowel in place with the actuator, and when released the weight of the dowel will unroll the flag. The possibilities are limited only by your own creativity with making use of the actuators.
Here is a brief video that demonstrates my drop box in action:


