A few months ago I was working on a show where I needed the ability to dowse a video projector. The problem with using video projectors in theater is that even when projecting a solid black image the projector is projecting light, so you can still see a big dark square when in a blackout. To work around this you use a dowser, which is essentially just a piece of black plastic that drops in front of the projectors lens when not in use. Companies like City Theatrical sell DMX dowsers that do precisely this. They are just a box that you attach to your projector that drops a plastic shield in front of the lens upon the appropriate DMX command. The problem with these dowsers is that they are EXPENSIVE! The City Theatrical dowser will set you back approx. $600, which is rather steep for what it does. If you hunt around you can find other DMX projector dowsers for sale, but they’re all over $200.
I had a servo from a radio controlled airplane lying around unused and with a little bit of hunting I came across a company that sells a DMX to servo controller. This lets you control up to 8 servos via 8 DMX channels, so it gives you a lot more flexibility than the commercial solutions. With a little bit of work, if you’re into tinkering, you can build your own custom DMX dowser with more features than the $600 City Theatrical one. I initially only needed a single dowser so I hacked together something quick using this DMX/servo controller and the spare servo, but at a recent show I needed to be able to dowse two projectors located 20 feet apart, so I decided to make more of a project out of my dowser. Here’s what I did:
First, you’ll need the DMX/servo controller board and one or more servos (if you don’t already have them). The DMX/servo controller operates at 12 volts, but servos typically run at 4.8 volts, so you need a way to address this difference. The answer is a relatively simple adjustable DC power supply. These are the guts of what I used for my dowser, just three components:
| Item | Cost |
| DMX/servo controller board from Northlight Systems | $49 |
| Hi-Tec HS-422 servo from ServoCity | $12.50 |
| Positive Adjustable Power Supply available many places | $20 |
So for three components that cost approximately $82 you can build your own dowser rather than spend $200-$600 for a commercial one. Note that the power supply is a kit that you’ll need to solder together yourself. If you hunt around a little you can find for sale for around $5 less, but most websites I found are selling it for around $20. I actually purchased mine at a local DIY/hobby shop in MA called “You-Do-It” Electronics. Of course you’ll probably also want to buy a case to put everything into and some other hardware components, but your total cost will likely still be in the neighborhood of $100.
When I built my dowser Northlight Systems only offered one DMX/servo controller with the DMX addressing switches mounted directly on the board. I bit the bullet and used this, deciding to set it to the address 505 so that it would use the 8 channels 505-512. I figured this was the safest range to use as it’s less likely to be used except in really large venues or where lots of other DMX devices are used. Of course I can always open it up and change the addresses if I need to. But you now have the choice to buy a controller with the address switches mounted on the circuit board or on an external board that you can mount separately. It’s entirely up to you.
Depending on how fancy you want to get you’ll likely want to purchase a few more things like a plastic case in which to mount everything, XLR connectors for the DMX connections, etc. I’ll leave all of that up to you to decide how you want to do it. At the very least I would suggest you purchase a coupler to connect your servo to a shaft, a matching shaft, and a clamping collar. The collar gives you an easy way to attach a dowser or other items to the shaft.
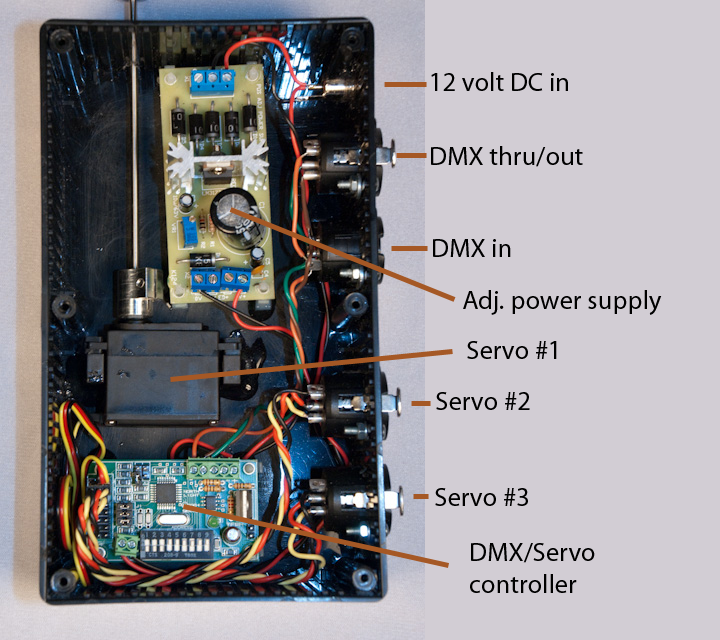
I decided to splurge when I redesigned my dowser. I put everything in one case to make it easy to use, but I also built two remote servos that I could easily add to it if necessary. To support the remote servos I added two XLR connectors to the dowser that let me plug in the other servos. Each remote servo is just mounted in a smaller box with a long cable connecting to an XLR cable. The controller has no problem controlling servos 10 feet away or more.
Here’s what my device looks like:

The 12 volt input feeds to both the variable power supply and directly to the 12v into the DMX/servo controller. The variable power supply is tuned according to its instructions to provide the 4.8 volts needed for the servo power inputs on the DMX/servo controller. Everything should be very straightforward.
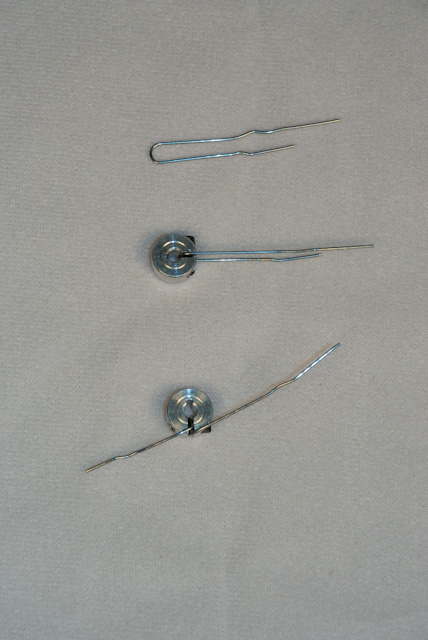
Once you’ve put all the components together just take a piece of cardboard or heavy plastic and cut an appropriately sized dowser out of it. I bought a black plastic report binder from a local office supply store which works quite well. Mount the device where you need it and measure the distance from the servo shaft to the farthest edge of the projectors lens. Add a couple inches to make sure it’s not too small. To mount the dowser to the servo shaft you can make use of the clamping collar and an ordinary paper clip. Just unbend the paper clip into a U shape then pass the U through the tightening nut of the clamping collar. Then bend the ends of the paperclip so that the entire thing is flush with the edge of the clamping collar. Use some gaff tape to tape the paperclip to the dowser and you’re all set. Here’s a photo showing how to do this:

That’s all there is to it. A fully functional DMX dowser for less than the cost of a commercially available one. And you can easily make use of other servo devices, multiple servos, etc. with his home-brew version. Before I built my dowser I worked on a show where I had to have rose petals flutter down onto the stage from overhead. If I had my dowser for that effect I would have just taped a small piece of cardboard horizontally to the servo shaft and put the petals on top of it. At the appropriate time just turn the servo and the petals would have dropped onto stage on cue.
A couple things to keep in mind if/when you’re building one of these:
- Use a 12 volt power supply since that’s what the controller board requires. If you use servos that require 4.8 volts or some other voltage then use the variable power supply to convert the 12 volts to whatever you need. Make sure to measure the output of the power supply and adjust it as necessary before hooking it up to the controller board.
- The servo shaft couplers are rather large. If you mount your servo in a case like I did then make sure the servo can turn through its entire range of motion without the shaft coupler hitting anything. You may need to turn the servo all the way in one direction to figure out the appropriate positioning of the coupler, then turn the servo all the way in the other direction to make sure the coupler swings freely.
- Servo’s don’t have a ton of torque so make sure the hole that the servo shaft passes through is large enough so as to not introduce a lot of friction. Also be sure the servo is lined up properly so the shaft passes through the hole without rubbing against the sides.
If you’d like any more details on this or have any specific questions feel free to post a comment or e-mail me directly (click on “About” at the top).
